If you plan to buy a new Mac or sell your current one, then you should ensure that you have erased any of your private data first. Or, perhaps you want to fix some troublesome issues that your Mac has been causing. Either way, in such instances, if you’ve tried everything and your Mac still isn’t behaving normally, then the best thing to do would be to perform a factory reset on your Mac.
However, before we get into that we should mention that if you intend to sell your Mac in the future, you should ensure that you take proper care of it now. This means keeping it safe from the risk of spills or damage by using a waterproof laptop sleeve. If you don’t already own one, go check out Lention’s (PCB-B300 Series) Notebook Case. This accessory comes in a convenient and compact design suitable for daily carry. Moreover, it is made of a water-resistant neoprene material that ensures your Mac stays fully protected from any accidental spills. Plus, it also comes with a small pouch perfect for packing any extra accessories that you may need, such as cables, chargers, or external storage devices.

How To Reset Your Mac
1. Backup your Data
Now, while performing a factory reset may sound tedious, it’s quite a simple process if you know how to do it. However, before doing a reset, you need to ensure that you have backed-up all your data onto another laptop or on an external hard drive. If you haven’t done this, then make sure you do so first. You don’t want to end up losing all your important documents, photos, videos, etc… because the reset will effectively erase everything from your Mac, OS included.
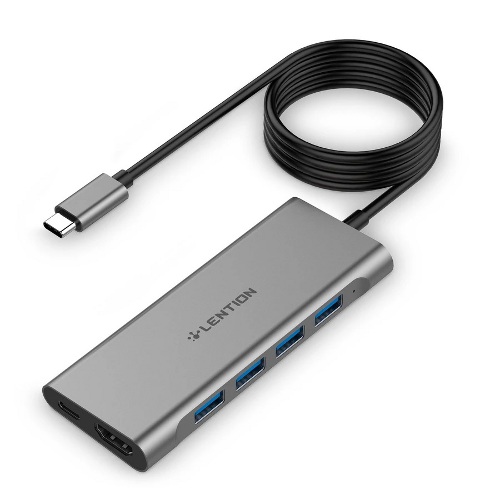
As stated before, you can do this manually by transferring your data to external storage space. In this regard, we recommend using a multiple usb c hub, as it will allow one to send files quickly and safely without worries of unexpected file corruption. If you don’t already own one, we suggest purchasing Lention’s (CB-C35H-1M) model. It is a universally compatible docking station that suits almost all computers, be it Windows or Mac. Plus, it also comes with 4 USB 3.0 Ports that are backward compatible with USB 2.0. This allows you to connect external devices such as keyboards, mobile devices, or storage drives. It also offers a high data transfer rate of up to 5Gbps, with 60W power pass-through to charge any external devices. Additionally, it features a 3.3ft extra cable extension that allows you to be more adaptable in your workspace for extra convenience.
Alternatively, you can choose to use the Time-Machine feature that is available on all Apple Macs. This is a backup utility that can automatically create a secure backup of all your documents, photos, videos, emails, etc. It is the recommended method instead of hand-picking the files one by one. You only have to connect your external storage disk, head to System Preferences > Time Machine > Select Disk. From there, you should be able to back up your data onto the external drive.
2. Sign out from Apple ID
You must sign out from your Apple account, as you do not want someone getting access to any of your data on iCloud. The process is pretty simple, and all you have to do is head to System Preferences > Apple ID > Overview > Sign Out. You should also ensure that you sign out from iMessage by heading to the app, clicking on Preferences > iMessage > Sign Out.
4. Place Your Mac in Recovery Mode
Once you are done with the first two steps the next thing that you need to do is to wipe your Mac clean. You can accomplish this by restarting your device and passing the Command + R buttons. Once the recovery prompt appears, select Disk Utility.
5. Erase your Mac hard drive
Once your Mac is set in recovery mode, you will arrive on the Disk Utility section. From there, you can select your Mac’s start-up disk which is normally named Macintosh HD and click on Erase. Fill in the required authorization details and ensure that you select the Mac OS Extended format.
That’s it. You have completed a factory reset of your Mac’s internal hard drive! If you are selling the device, you can turn off the Mac and hand it down to its new owner. However, if you wanted to reset your Mac to start over, then you can reinstall your macOS by rebooting the Mac in recovery mode once again and selecting Reinstall macOS.
Additional Tips
The process may seem daunting at first, but it’s good to have this information handy. If you ever need to reset your Mac for whatever reason, you now know what to do. However, always take extra care of your Mac, so that if you do need to sell it, it’s still in good condition. And one of the best ways to do this is by owning a macbook pro standing dock. This accessory is useful, as it allows you to stop putting too much pressure on your Mac and start using your iPad more. It accomplishes this by expanding your iPad’s connectivity ports and giving you the kind of functionality that your Mac would normally provide.
In this regard, we suggest purchasing Lention’s (CB-D42) model. Despite being small in size, it is a 7-in-1 docking station that is reasonably powerful. It comes with two USB 3.0 ports, two SD card slots, one 4K HDMI port, and one USB-C charging port, that provides a power pass of up to 100W. It also includes one 3.5mm Audio port for connecting headphones. This makes it an extremely versatile dock that should prove ideal for both professional and home users.


